

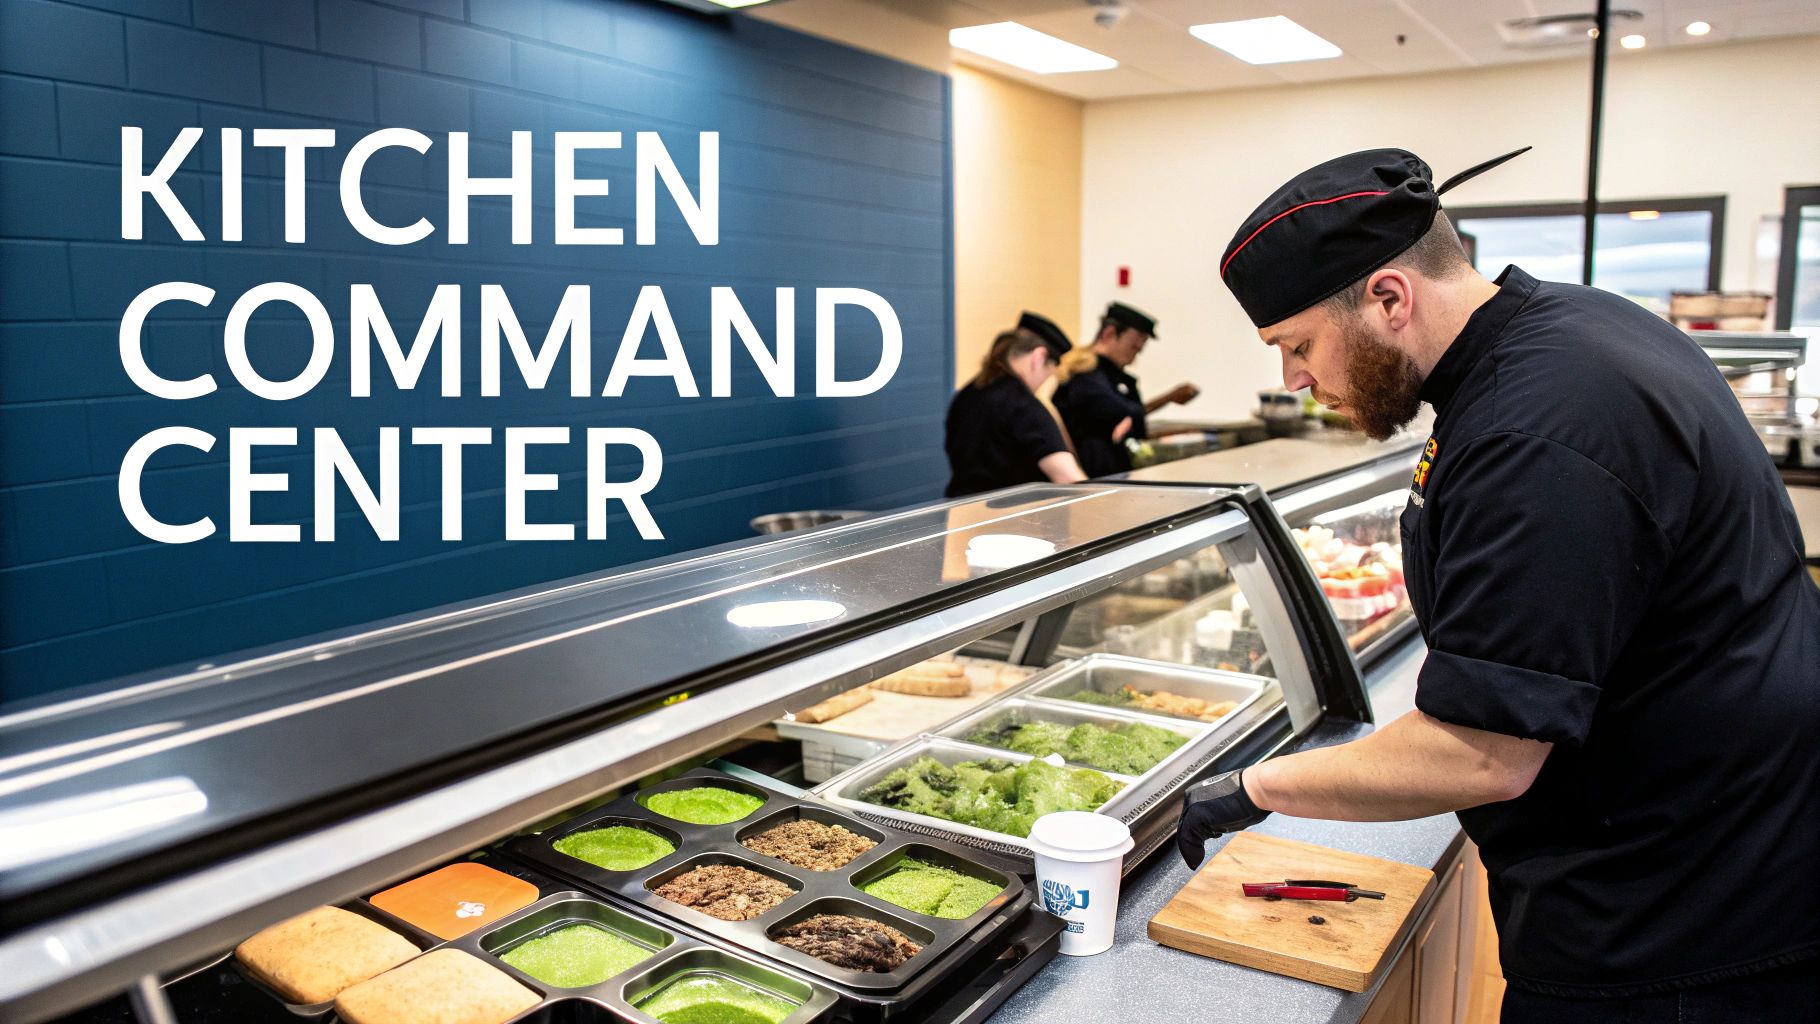
Think about the chaos of a busy lunch rush. Orders are flying in, and your crew is scrambling to build perfect sandwiches and salads. In that moment, your refrigerated sandwich prep table isn't just a piece of equipment; it becomes the command center for your entire operation.
This is way more than a cooler with a cutting board slapped on top. It's a purpose-built workstation, engineered to make your kitchen faster, safer, and more efficient.
Let's break down how these units turn that potential chaos into a smooth, profitable service. We'll look at the core parts that work together and see how they help you nail the food safety standards that are non-negotiable for any Seattle restaurant, coffee shop, or bar.
Core Components of a Refrigerated Sandwich Prep Table
At first glance, a sandwich prep table might seem straightforward, but it's a finely tuned system where every part has a job. Getting to know these components is the first step in seeing just how valuable one can be for your kitchen's workflow.
To put it simply, here’s how the essential parts function together:
| Component | Primary Function | Benefit for Your Kitchen |
|---|---|---|
| The Refrigerated Base | Undercounter cold storage for bulk ingredients and backup items. | Keeps extra meats, cheeses, and sauces chilled and ready for immediate restocking. |
| The Chilled Pan Rail | Holds multiple food pans with every ingredient needed for your menu. | Ensures every topping stays within the critical 33°F to 41°F food-safe zone. |
| The Cutting Board | Provides a durable, dedicated surface for assembling orders. | Creates an ergonomic workspace directly in front of all your chilled ingredients. |
Each of these parts is designed to eliminate wasted steps, keeping your team focused on building orders instead of running back and forth to a separate refrigerator.
Why This Equipment Is a Game-Changer
It's no surprise that the demand for these workstations is booming. The global market for refrigerated prep tables hit $2.1 billion in 2024 and is on track to reach $3.7 billion by 2033. Sandwich and salad prep units are leading the charge, making up nearly 42% of that market.
Why the huge growth? It's simple: customers want fresh, made-to-order food, and they want it fast. This pressure pushes kitchens to invest in equipment that can boost prep speed by up to 30% compared to using separate refrigerators and prep counters. If you're interested in the numbers, you can read the full research about these market trends to see why this is such a smart investment.
By combining cold storage with a dedicated prep surface, these tables help you slash ticket times and keep customers happy. For any food service business, that makes them a true cornerstone of success.
Choosing the Right Prep Table Configuration
Not every refrigerated sandwich prep table is built the same. Picking the right one isn't about the price tag; it's about finding the perfect match for your kitchen's unique flow, your menu, and how many customers you serve each day. This is your no-nonsense buyer's guide—a way to pick a unit that acts like a key player on your team, not just another hunk of stainless steel.
Getting the configuration wrong can create a serious bottleneck right in the middle of a lunch rush. Imagine a busy Seattle sandwich shop that didn't get a big enough unit—they'll be running to the walk-in to restock ingredients constantly. On the flip side, a small coffee shop with a massive prep table is just wasting floor space and burning extra electricity. The goal is to land in that sweet spot where your equipment works in rhythm with your business.
Standard vs. Mega-Top Tables
Your first big decision is usually between a standard-top and a mega-top model. The standard-top is the classic workhorse. It gives you a single row of ingredient pans right next to the cutting board. This setup is great for businesses with a straightforward menu, like a small café or a bar that only serves a few signature sandwiches.
A mega-top, on the other hand, is a lifesaver for kitchens with high volume or lots of customization. These units have a much deeper refrigerated rail that can hold a second, and sometimes even a third, row of pans.
For a deli that's all about "build-your-own" sandwiches, a mega-top isn't just nice to have—it's essential. It bumps up your ingredient capacity by 30-50%, which means less time spent restocking mid-rush and more time keeping the line moving.
Think about a busy pizzeria that also sells a lot of sandwiches. A pizza prep table is designed with a much wider cutting board for handling dough. But a mega-top sandwich table gives you a similar amount of ingredient space in a format that's better for building sandwiches and salads. It all comes down to what's making you the most money.
The Role of Doors vs. Drawers
Underneath the work surface, you've got another important choice: doors or drawers? This decision has a direct impact on your kitchen's organization and workflow.
- Door Models: This is the most common setup. You get open shelving inside a refrigerated cabinet, perfect for storing bigger, bulk items. Think backup containers of sliced turkey, large blocks of cheese, or tubs of house sauce. They work like small, built-in under counter refrigerators for your overflow.
- Drawer Models: If you're all about organization, drawers are the way to go. You can dedicate each drawer to specific, pre-portioned ingredients, which makes for a much faster "grab-and-go" assembly process. They operate like an under counter freezer or fridge but with dividers that keep everything exactly where it should be.
For a lot of places, a combination unit is the best of both worlds. You might find a 60-inch table with one doored section for your bulk storage and two drawers for the ingredients you reach for most often. Taking a look at the full lineup of refrigerated sandwich prep tables we offer at Seattle Restaurant Equipment is a great way to see what combination makes sense for your space.
Understanding Compressor Placement
Finally, there’s a technical detail with big real-world consequences: where the compressor is located. The compressor is the heart of your prep table, and its placement dictates where the unit can live in your kitchen.
- Rear-Breathing: These are the most common. The compressor is in the back and needs a few inches of space from the wall to breathe. If you block that airflow, the unit will overheat and burn out way too soon.
- Front-Breathing: These units have their vents on the front, which means you can push them right up against a wall or even build them into a counter. This design is a lifesaver in tight kitchens where every inch matters, which is why you see them so often in Seattle bar equipment setups where space is always tight.
By thinking through your menu, your storage system, and your kitchen's layout, you can pick a configuration that will make your whole operation run smoother for years to come.
Essential Features That Define Quality and Performance
Once you’ve landed on the right size and style for your refrigerated prep table, it's time to look under the hood. What separates a workhorse unit that will last for years from one that’s going to give you constant grief? It’s a lot like buying a car—the model gets you in the door, but the engine, the build quality, and the little details are what really count on the road.
Looking past the price tag is key for any Seattle kitchen, whether you're a high-volume downtown spot or a neighborhood cafe. Investing in quality means your equipment can take the heat of daily service without breaking a sweat. The right features are your best insurance for consistent food safety, lower energy bills, and a happier, more efficient crew.
The Foundation of Durability: Stainless Steel
The first thing to check is the metal your prep table is made of. It's your unit's armor against the chaos of a commercial kitchen. While most tables are stainless steel, not all steel is created equal. You’ll generally run into two types:
- 304 Stainless Steel: This is the good stuff. You'll want to see it on the top surface and inside the cabinet. With more nickel in its makeup, it's tough as nails against corrosion from salt and acidic foods like tomato sauce or salad dressings.
- 430 Stainless Steel: This is a more budget-friendly grade often used for the exterior sides and back. It's perfectly fine for areas that aren't in direct contact with food, but you wouldn't want it on your main work surfaces.
For any surface that touches food, 304 stainless steel isn’t just a nice-to-have; it's a must. It guarantees your table is easy to sanitize and will resist the pitting and rust that can become a breeding ground for bacteria. A quality unit from Seattle Restaurant Equipment will use the right grade in the right place, giving you the best of both worlds—performance and value.
The Engine of Your Prep Table: Compressor and Controls
The refrigeration system is the heart of your prep table, plain and simple. Its reliability directly affects food safety and your power bill. A high-efficiency compressor doesn’t have to kick on as often or run as long to keep things cool, which saves you money and adds years to the unit’s life.
Working hand-in-hand with the compressor are the temperature controls. Modern refrigerated sandwich prep tables have digital thermostats, which are a massive upgrade from old-school analog dials. Digital controls let you lock in a precise temperature, ensuring your ingredients stay safely in the 33°F to 41°F zone. That kind of accuracy is crucial for acing health inspections and preventing expensive food waste.
NSF Certification: A Mark of Trust Always, always look for the NSF (National Sanitation Foundation) seal. This little sticker means the prep table has been put through the wringer and meets strict standards for public health and safety. An NSF-certified unit is designed to be cleaned easily and is built from materials that won’t contaminate food, making it a non-negotiable for any professional kitchen.
Practical Features That Make Life Easier
Beyond the core construction, a few smart design choices can make a huge difference in your daily workflow. Here's a quick look at some key features that separate the good from the great.
Feature Comparison for Sandwich Prep Tables
A side-by-side look at essential features to help you decide what's best for your foodservice operation.
| Feature | Standard Option | Premium/High-Volume Option | Why It Matters |
|---|---|---|---|
| Doors | Swing doors | Self-closing doors | Prevents doors from being left ajar during a rush, saving energy and protecting food. |
| Cutting Board | Standard polyethylene | Thicker, non-porous polyethylene or composite | A thicker, higher-quality board is easier to clean, won't warp, and is gentler on your knives. |
| Mobility | Legs (casters may be an add-on) | Standard heavy-duty casters (wheels) | Casters are essential for pulling the unit out for deep cleaning behind and underneath. |
| Shelving | PVC-coated wire shelves | Heavy-duty, epoxy-coated or stainless steel shelves | Upgraded shelves handle more weight without sagging and resist chipping or rusting over time. |
These features might seem small, but they add up to a more efficient, safer, and cleaner kitchen. A unit that works with you, not against you, is always the better investment.
This decision tree gives you a simple way to think about matching a prep table type to your kitchen's output.
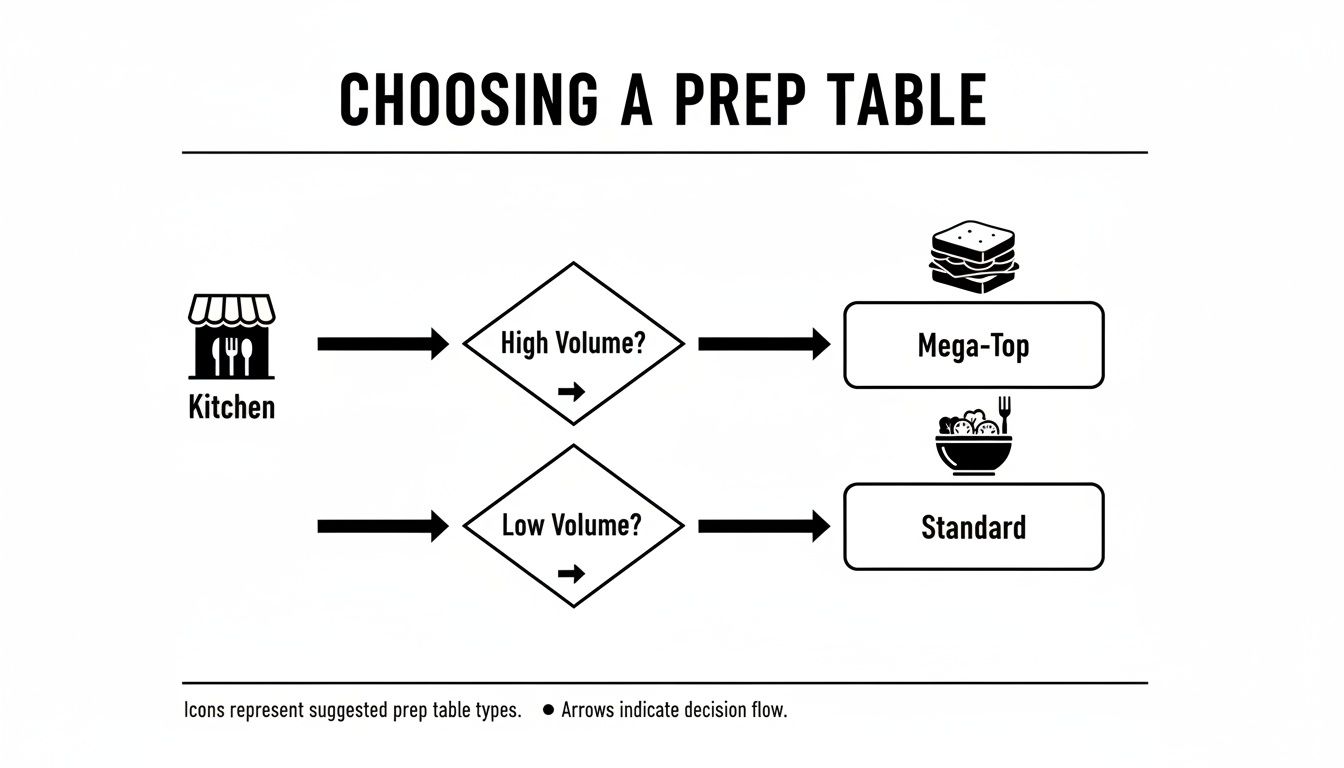
As the chart shows, if your kitchen is constantly slammed, a Mega-Top model is probably your best bet because of its extra pan capacity.
Self-closing doors are a perfect example of a simple but brilliant feature. They stop staff from accidentally leaving a door open during a busy service, which keeps the cold air in and reduces stress on the compressor.
The cutting board is another detail to watch. While most tables include a standard polyethylene board, the thickness and quality make a difference. A durable, non-porous board is far easier to sanitize and won't dull your knives as quickly.
Finally, don't overlook casters (wheels). They are an absolute must-have. Being able to easily roll the unit away from the wall makes it a thousand times easier to clean the floor and the unit's condenser coils. That simple mobility is critical for maintaining hygiene and the long-term health of your equipment.
Integrating Your Prep Table for Maximum Kitchen Flow
A new refrigerated prep table can be the engine of your kitchen, or it can be a massive roadblock. What makes the difference isn't the unit itself—it's how you fit it into your workspace. Smart planning turns a simple metal box into the central hub for a smooth, efficient kitchen.
Think of your kitchen like a highway system. Your prep line is the main artery. A poorly placed prep table is like a sudden lane closure during rush hour. It causes jams, slows everything down, and stresses everyone out. The goal is to create a layout where staff and ingredients move from one station to the next without a hitch.
Before your new unit even shows up, grab a tape measure. You need to think about more than just where it will end up. Measure every doorway, hallway, and tight corner it has to pass through. There's nothing worse than realizing your brand-new 60-inch table won't squeeze through a 58-inch door frame.
Designing an Ergonomic Workflow
Once you're sure the table will actually get into the kitchen, it's time to think strategically. The best spot isn't just an empty patch of floor; it's the place that cuts down on wasted steps and makes life easier for your crew.
Your refrigerated sandwich prep tables should be part of a logical sequence. It makes sense to place it near your commercial freezers or under counter freezers where backup proteins and ingredients are stored. This makes restocking a quick, painless job. If your sandwiches often get paired with fries, setting the prep table near your deep fryers streamlines the final plating process.
The "kitchen work triangle" is a classic for a reason. It connects your main zones: storage, prep, and cooking. By placing your prep table smartly within this flow, you can cut down on staff movement by up to 25%. That translates directly into faster ticket times and less tired employees.
Vital Placement and Ventilation Considerations
Beyond workflow, a few technical details are absolutely critical for the health of your equipment. Two of the biggest are compressor ventilation and door clearance.
- Give the Compressor Room to Breathe: Most prep tables have a rear-breathing compressor. They need at least 3-4 inches of space from the wall to get proper airflow. Shoving it right up against the wall is like forcing a runner to breathe through a straw—the unit will overheat, work way too hard, and burn out fast.
- Check Door and Drawer Clearance: Always account for the full swing of every door and the pull of every drawer. Make sure they can open all the way without smacking into other equipment or blocking a walkway. This is a big deal for both accessibility and kitchen safety.
This same logic applies to all of your equipment, from your Seattle bar equipment to the under counter refrigerators in a busy cafe. A well-planned kitchen is the foundation of a profitable operation.
By integrating your prep table with a little bit of foresight, you ensure it adds to your kitchen's rhythm instead of disrupting it.
Mastering a Routine for Food Safety and Maintenance
Your refrigerated sandwich prep table is the engine of your kitchen's front line. Keeping it in prime condition isn't just about cleaning—it's about protecting your customers, your good name, and your investment. A consistent maintenance routine is your best defense against surprise breakdowns and dreaded health code violations, making sure your equipment runs like a top for years.
Think of this routine like the check-ups you'd do for a high-performance vehicle. A few minutes of preventative care each day, week, and month can literally save you thousands of dollars in emergency repairs and spoiled product. This simple, structured approach ensures every part of your prep table, from the cutting board to the condenser coil, is always ready for the dinner rush.
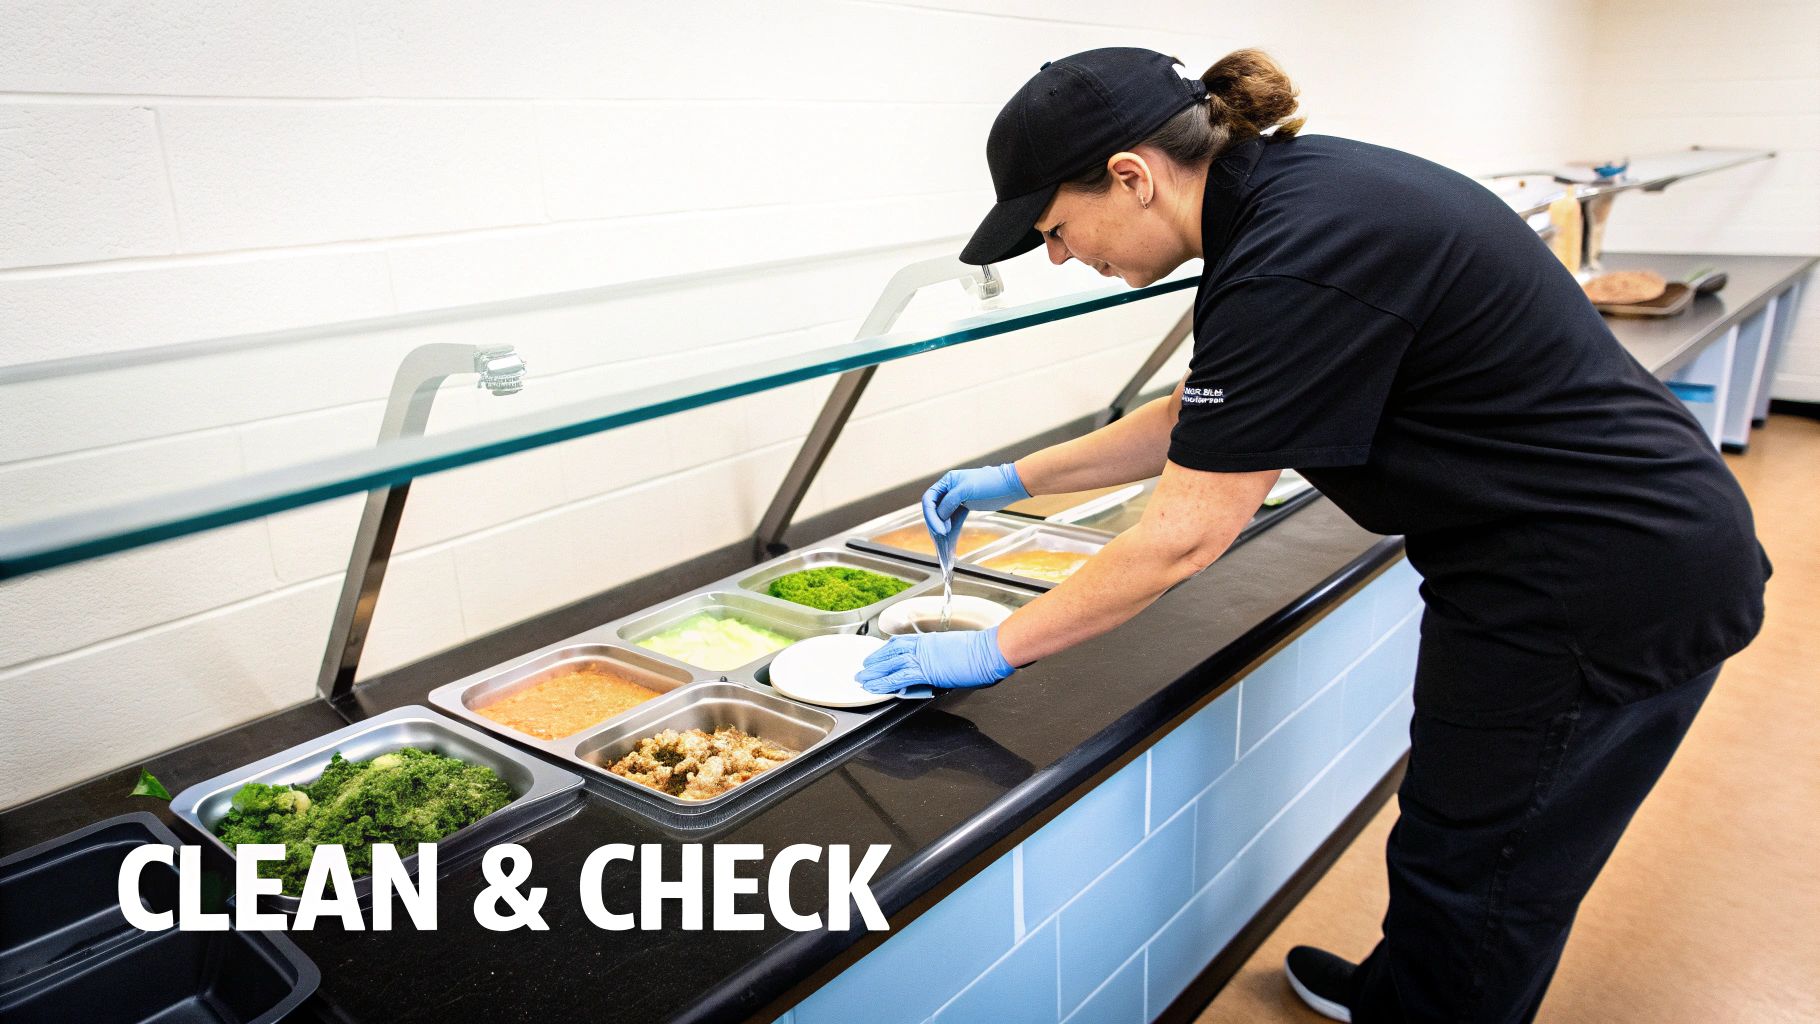
Your Daily Food Safety Reset
The end of every shift is your first line of defense against cross-contamination and foodborne illness. These quick jobs are non-negotiable. They set the stage for a safe and productive next day.
- Sanitize All Food Contact Surfaces: Give the cutting board, the inside and outside of the unit, and all door handles a thorough cleaning and sanitizing. This is crucial for stopping harmful bacteria from building up.
- Clean and Store Food Pans: Pull all the ingredient pans from the rail. They need to be washed, sanitized, and dried completely before you store ingredients overnight in the refrigerated base or a walk-in.
- Wipe Down Gaskets: Gently wipe the rubber door seals with a damp cloth to clear away any food bits. This simple step prevents grime from making the seals brittle or causing them to tear.
Weekly Upkeep for Peak Performance
Once a week, you'll want to dedicate a few extra minutes to tasks that keep your table's mechanical parts healthy and everything truly clean. This deeper clean stops minor issues before they can blow up into major problems.
A crucial weekly check is the "dollar bill test." Close the refrigerator door on a dollar bill. If you can pull it out with zero resistance, the gasket is worn out and leaking cold air. A bad seal forces your compressor to work overtime, which wastes energy and shortens its lifespan.
Here's your weekly checklist:
- Deep Clean the Interior: Take out all the shelving and supports. Scrub the inside of the cabinet to get rid of any spills or sticky residue that a daily wipe-down might have missed.
- Clear the Drain Lines: To prevent clogs and nasty odors, pour a mix of warm water and a mild, food-safe cleaner down the interior drain lines.
- Inspect and Rotate Stock: Use this time to practice a "First-In, First-Out" (FIFO) system with your inventory. It ensures you use older products first and keeps waste to a minimum.
Monthly Maintenance That Prevents Breakdowns
Monthly tasks focus on the heart of your refrigerated prep table—the refrigeration system itself. These actions are the single most effective way to prevent the kind of catastrophic failures that can shut down your entire prep line.
The single most important maintenance task is cleaning the condenser coil. A dirty, clogged coil can force the compressor to work up to 30% harder, leading to premature failure and shocking energy bills. This is the number one cause of costly, avoidable repair calls we see.
Cleaning the coil is simple. Unplug the unit, grab a stiff brush to loosen the caked-on dust and grease, and then use a vacuum to clear it all away. For most kitchens here in Seattle, doing this every 90 days is plenty. But, if you're a high-volume spot with more airborne grease—especially if you're running deep fryers—monthly cleaning is a must. This 15-minute task can single-handedly extend the life of your equipment and save you a fortune.
Why a Local Equipment Partner Matters
Sure, you can find kitchen equipment online from a hundred different national retailers. But when a core piece of your operation goes down, you quickly realize the value of having a local partner. It’s the difference between buying a machine and gaining an ally.
Working with an expert team like Seattle Restaurant Equipment isn't just a transaction; it's a relationship built on keeping your kitchen running. It all starts with peace of mind. Every piece of equipment, from refrigerated sandwich prep tables to commercial freezers, is backed by a solid warranty. If something goes sideways, you’re not calling an anonymous 1-800 number. You’re calling a local team that knows a down fridge in a Seattle restaurant is a full-blown emergency.
The Power of Local Logistics and Support
In the restaurant world, time is everything. Waiting a week for a prep table to ship across the country just isn’t an option. A broken unit can shut down your line and cost you a fortune in lost revenue. We get that, which is why we offer fast, free shipping across Washington state.
When you order from us, your gear arrives at your door in Seattle, Tacoma, or Spokane in just 1-2 business days. That’s not an exaggeration. It applies to our entire lineup, including:
- Commercial refrigerators and under counter refrigerators for your essential cold storage.
- Specialty units like pizza prep tables and Seattle coffee shop refrigerators.
- Workhorses like deep fryers that keep your kitchen humming.
This speed means less downtime and more time doing what you do best: serving customers. You get what you need, when you need it, without the cross-country shipping headache.
Flexible Financing for Every Washington Business
Top-tier equipment is an investment. We know the upfront cost can be a major hurdle, whether you’re launching a new food truck or upgrading your bar. But we don't think a tight budget should stop you from getting the reliable tools you need to grow.
Partnering with a local supplier is about more than just convenience. It's about having access to resources and expertise that are directly invested in the local economy and understand the specific challenges and opportunities of operating a food business in Washington.
We offer flexible financing options designed for the local food scene. Whether you’re outfitting a kitchen with Seattle bar equipment or grabbing new under counter freezers for your restaurant, we’ll work with you. Our goal is to find a plan that fits your budget, so you can get the gear you need without tying up all your capital. From a single sandwich table to a full kitchen package, we’re here to help you succeed.
Frequently Asked Questions
When you're looking to invest in new gear for your kitchen, a few questions always pop up. It's smart to get the full picture on performance, maintenance, and how a new unit will fit into your workflow before you buy. Here are some of the most common questions we get from restaurant owners around Seattle.
Can I Use a Pizza Prep Table for Sandwiches?
You could, but you'd be making life harder for your crew. The biggest difference is the workspace itself. Pizza prep tables have a much deeper cutting board designed for stretching out large doughs, and their rails are often raised to hold big pans of toppings.
A dedicated sandwich prep table, on the other hand, gives you a slimmer cutting board and a flat rail. This setup creates a smooth, efficient line for building sandwiches, salads, or wraps. Using the right tool for the job simply makes your team faster and more comfortable during a busy service.
What Is the Ideal Temperature Range?
For food safety, the magic number is between 33°F and 41°F (that’s 0.5°C to 5°C). This is the critical range that keeps your perishable ingredients out of the "danger zone" where harmful bacteria can grow like crazy.
Every commercial refrigerator we carry, from Seattle coffee shop refrigerators to undercounter units, is built to hold this exact temperature range. It’s all about helping you nail health inspections and serve food that's as fresh as it gets.
How Often Should I Clean the Condenser Coils?
This is easily the most important maintenance task on your list. For the average kitchen, giving the condenser coil a good cleaning every 90 days is perfect. But if your kitchen has a lot of grease in the air from fryers or a busy griddle, you should bump that up to a monthly cleaning.
A dirty, clogged condenser coil makes the compressor work up to 30% harder. That means higher energy bills and a much shorter life for the unit. A few minutes of cleaning can literally save you thousands in repair bills or premature replacement costs for your commercial freezers and prep tables.
A little bit of upkeep ensures all your equipment, from your main prep station to your under counter freezers, runs like a champ for years.
Ready to get your kitchen set up for success? Seattle Restaurant Equipment has a huge selection of commercial-grade refrigerated sandwich prep tables and everything else you need.