

Let's be real, designing a commercial kitchen is a huge undertaking. It's not just about picking out a shiny new stove; it's about building the engine that will drive your entire restaurant. A smart layout is the difference between a smooth, profitable service and a chaotic, stressful Saturday night.
Think of your kitchen as the heart of your operation. A well-designed space optimizes workflow, makes your staff more efficient, and directly fattens your bottom line. It ensures every single step, from the moment a delivery truck arrives to the final plate hitting the pass, is as seamless as possible. This means less wasted motion, fewer costly mistakes, and a happier crew who can actually focus on the food.
We're going to skip the generic advice and get right into the nitty-gritty, the stuff that actually matters in the real world of a busy kitchen.
Sourcing Your Core Equipment in Seattle
The foundation of any great kitchen is solid, reliable, commercial-grade equipment. Finding the right gear is a massive piece of the design puzzle. For those of us in Washington, having a local partner like Seattle Restaurant Equipment makes life a lot easier, giving you direct access to the essentials that bring your menu to life.
Before you can even think about layout, you need to know what you're putting in it. The core components are the workhorses that will see action every single day:
- Commercial Refrigerators & Commercial Freezers: The absolute backbone of your inventory management and food safety. Don't skimp here.
- Sandwich Prep Tables & Pizza Prep Tables: These units are brilliant for creating efficient, self-contained workstations that speed up assembly.
- Under Counter Refrigerators & Under Counter Freezers: Perfect for maximizing every square inch of space and setting up satellite prep or service stations right where you need them.
- Deep Fryers: A non-negotiable for a huge number of menus, and they require very specific placement for both safety and ventilation.
Of course, beyond these staples, you'll need the specialized gear for your specific concept. Choosing the right Seattle bar equipment or the perfect Seattle coffee shop refrigerators ensures your layout is built perfectly for your unique operation. This guide is all about helping you think through these choices to create a space that works for you, not against you.
Creating Smart Zones for a Seamless Workflow
A chaotic kitchen is an inefficient kitchen. During a dinner rush, that chaos will absolutely kill your service and your profits. The real secret to a smooth, money-making operation isn't just about speed; it's about smart, strategic zoning.
This means you’re creating dedicated areas for every single task. It cuts out the frantic running around, eliminates dangerous bottlenecks, and seriously reduces the risk of cross-contamination. When your team isn't bumping into each other or scrambling for a tool, they can focus on what they do best: putting out incredible food.
Think of it as creating a one-way street for your ingredients. They come in the back door, move through prep and the cooking line, and go out to the customer as a finished dish. Dirty plates and pans have their own separate path back to the dish pit. This is the bedrock principle for designing a restaurant kitchen that can handle the pressure.
The Five Essential Kitchen Zones
Every great commercial kitchen I've ever been in is built around five core zones. Each has a specific job, and each needs the right gear to work. Nailing the layout of these zones is your first big win in creating that seamless workflow.
- Receiving Zone: This is ground zero, where all your food and supplies enter the building. You want it right next to the back door to make life easier for delivery drivers and your own staff. The goal is to get inventory checked in and put away, fast.
- Storage Zone: Right next to receiving, this zone holds your dry storage racks and your walk-in coolers and freezers. Quick access to your commercial refrigerators and commercial freezers is non-negotiable. You have to get perishables into the cold immediately to keep them safe.
- Preparation Zone: This is where the magic starts—washing, chopping, mixing, and portioning. It needs plenty of prep table space, dedicated sinks, and its own refrigeration. An under counter refrigerator here is a game-changer, keeping high-use ingredients right where the cook needs them.
- Cooking Zone: The heart of the operation. This is your "hot line," home to the ranges, ovens, griddles, and deep fryers. The layout here is absolutely critical and has to be designed specifically for the dishes on your menu.
- Service and Dishwashing Zone: The service area is the last stop before a plate hits the dining room, so it needs heat lamps and plating space. The dish pit should be separate enough to prevent dirty water from splashing onto clean food but close enough that servers aren't taking a long hike to drop off dirty dishes.
This flowchart really shows how a smart workflow is the foundation for everything else you do in the kitchen.
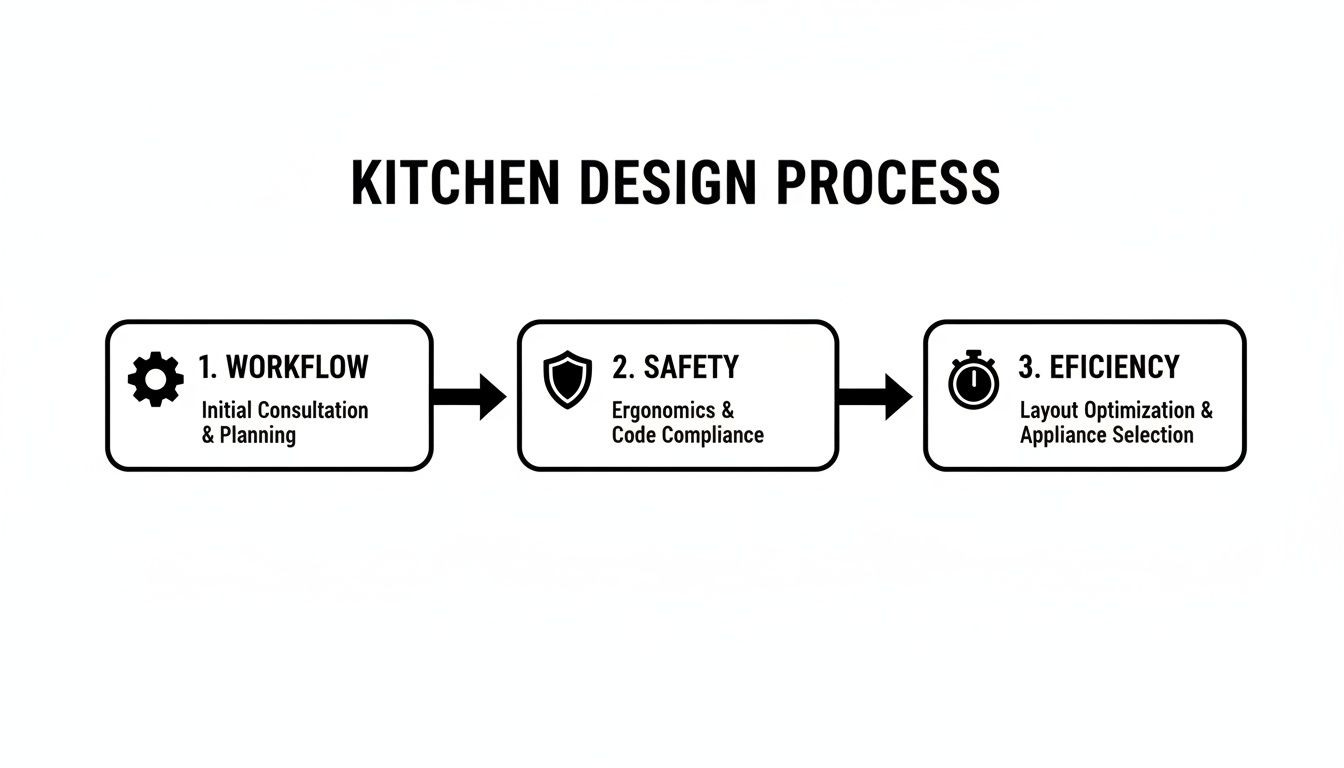
As you can see, when the flow is logical, safety and speed naturally follow.
Zone-Specific Equipment Strategies
Okay, let's get practical. The equipment you choose from a supplier like Seattle Restaurant Equipment—and where you put it—is what makes this whole concept work.
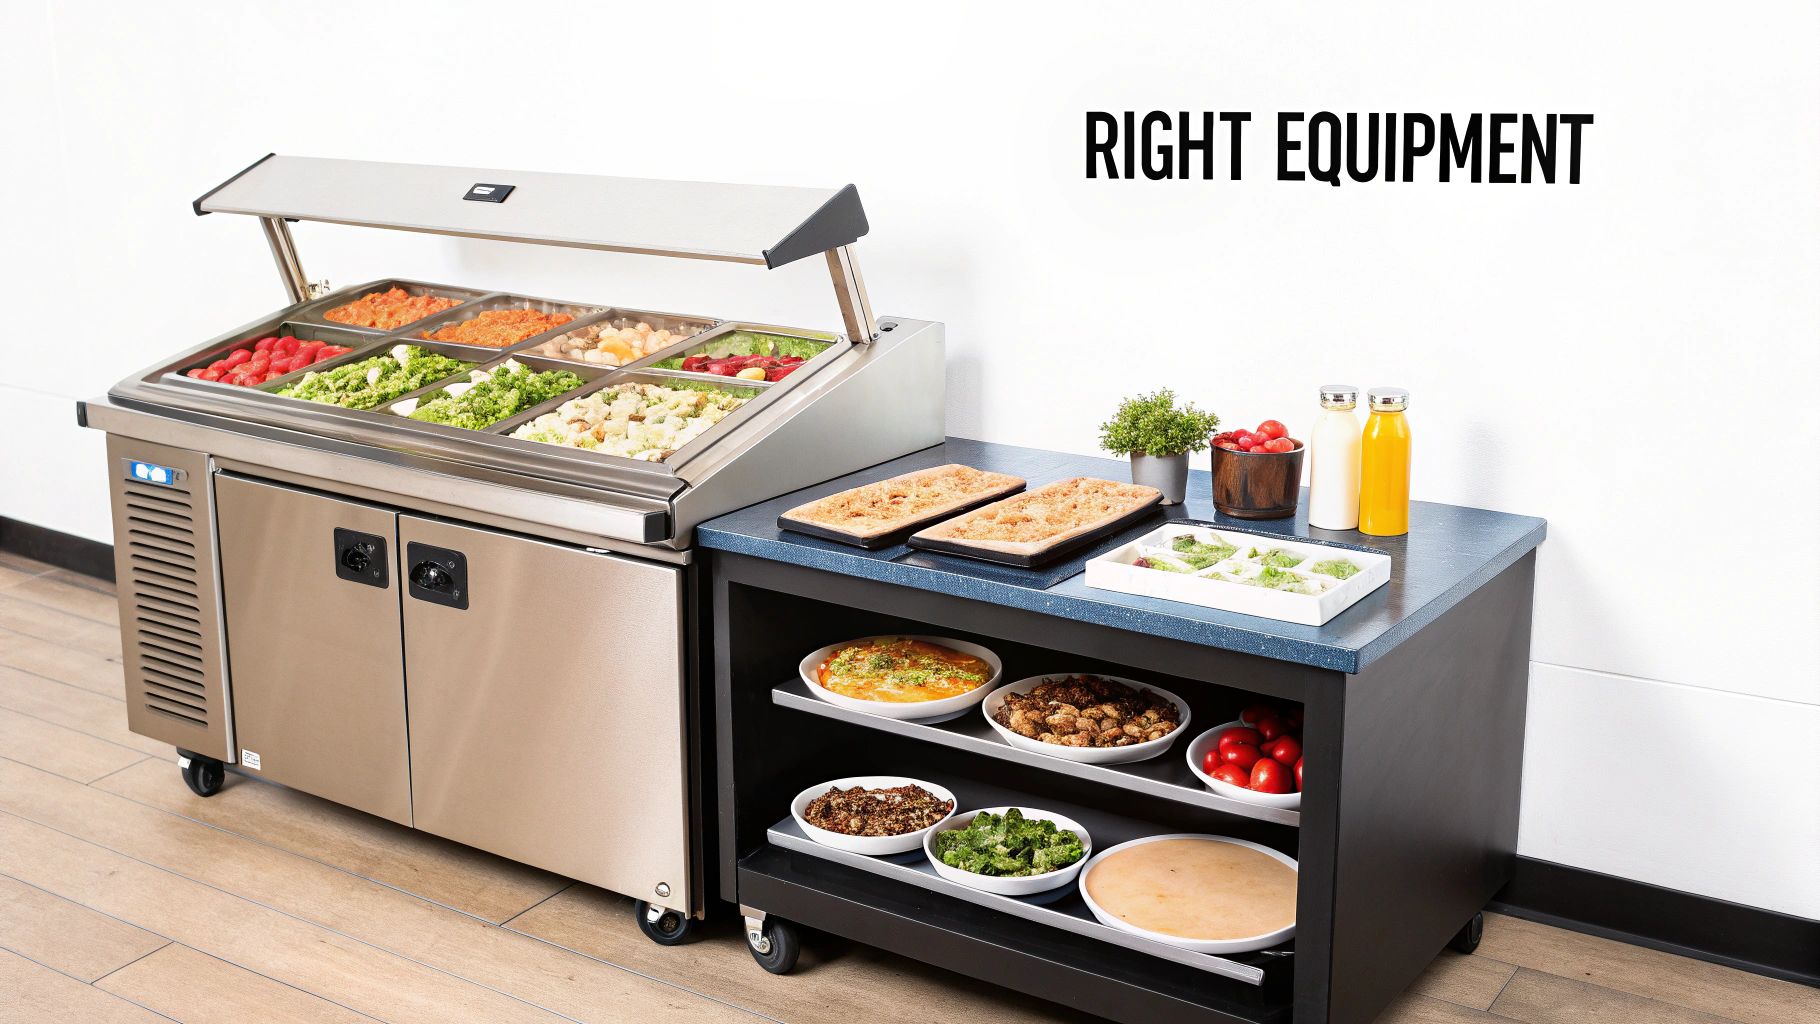
For a high-volume Seattle deli, the prep zone is everything. A top-tier sandwich prep table isn't just a table; it's a command center. It gives you refrigerated storage below, a cooled topping rail up top, and a cutting board. Everything your sandwich artist needs is within arm's length, which drastically cuts down ticket times. A pizzeria gets the same boost from a dedicated pizza prep table.
A common mistake I see is skimping on satellite refrigeration. Putting a small under counter freezer right next to the fryer for fries and onion rings means the cook never has to leave the hot line mid-rush. It's a small detail that makes a huge difference.
Even a coffee shop or bar lives and dies by this logic. For Seattle bar equipment, that means placing under counter refrigerators strategically for mixers, garnishes, and backup bottles. A Seattle coffee shop refrigerator setup might have a glass-door merchandiser for grab-and-go items by the register and a dedicated milk fridge right by the espresso machine. Every choice is about saving steps and increasing output.
We've broken down the essential zones and the core equipment you'll need from a trusted partner like Seattle Restaurant Equipment to get each one humming.
Essential Kitchen Zones and Their Core Equipment
| Kitchen Zone | Primary Function | Key Seattle Restaurant Equipment |
|---|---|---|
| Receiving | Accepting and verifying incoming deliveries of raw ingredients and supplies. | Heavy-duty scales, utility carts, shelving for temporary holding. |
| Storage | Proper long-term and short-term holding of all inventory (dry, refrigerated, frozen). | Commercial refrigerators, commercial freezers, walk-in coolers, wire shelving racks. |
| Preparation | Washing, cutting, mixing, and portioning ingredients before cooking. | Stainless steel prep tables, commercial sinks, under counter refrigerators, food processors. |
| Cooking | Applying heat to transform prepared ingredients into finished menu items. | Commercial ranges, ovens, charbroilers, griddles, deep fryers, ventilation hoods. |
| Service & Warewashing | Plating finished dishes for pickup and cleaning all used dishes and cookware. | Heat lamps, plating stations, pass-through windows, commercial dishwashers, 3-compartment sinks. |
Having the right gear in the right place is what turns a good layout into a high-performance machine.
Ultimately, zoning is about creating an environment where your staff can thrive. A well-designed kitchen reduces stress, cuts down on mistakes, and lets your team perform at their peak. To get even deeper into this, check out our comprehensive guide on setting up a restaurant kitchen.
Matching Your Equipment to Your Menu
Think of your menu as more than just a list of dishes—it's the actual blueprint for your entire kitchen. Every single piece of equipment you buy should directly support the food you’re dreaming of serving. It's easy to download a generic checklist, but a truly efficient kitchen is built around very specific, menu-driven decisions that give your team the power to execute your vision, even on a slammed Saturday night.
This is where the rubber meets the road. The whole point is to invest in tools that don't just cook food but actually make your workflow faster and your dishes more consistent. Sourcing the right commercial-grade gear from a partner like Seattle Restaurant Equipment means you're getting reliability that’s built for your specific operation.
Let's put this in real-world terms. If your signature item is a complex, multi-ingredient sandwich, your service speed is 100% dependent on your prep line. This is where choosing the right equipment stops being an expense and starts driving your revenue.
Prep Tables: The Heartbeat of Your Assembly Line
For concepts like delis, pizzerias, or cafes that are heavy on salads, the prep table isn't just a surface; it's mission control. Picking the right model can completely change how many customers you can serve in an hour.
Imagine a busy deli in downtown Seattle. A standard 48-inch sandwich prep table might look like enough, but jumping up to a 60-inch model gives you room for 25% more ingredient pans in the refrigerated rail. It sounds like a small upgrade, but it means your crew isn't constantly running to the walk-in to restock. That keeps the line moving and shaves precious seconds off ticket times during that chaotic lunch rush.
The same logic works for pizzerias. A pizza prep table is about more than just a big marble top for stretching dough. It's about how many toppings you can fit in the refrigerated rail and what you can store in the under-counter space. A larger unit lets you keep every topping for your entire menu right there, creating an assembly line that you just can't replicate otherwise.
Here’s a critical mistake I see all the time: underestimating prep needs. It's always, always better to get a slightly larger prep table with more cold storage than you think you need. Running out of space mid-service creates an instant bottleneck that costs you time and sales.
Building Your Hot Line Around Core Dishes
Your cooking line is where the magic happens and your menu really comes to life. The gear you choose here doesn't just decide what you can cook, but also how fast and consistently you can do it. It's a huge investment, and it’s part of a booming industry. The global market for commercial kitchen appliances hit an estimated USD 98.34 billion in 2024 and is projected to reach USD 149.34 billion by 2030. Ovens alone accounted for 16.5% of that revenue in 2024. That kind of growth just underscores how important it is to make smart, durable equipment choices. You can dig into the numbers and trends in this detailed industry analysis from Grand View Research.
So, for a gastropub menu built on burgers, wings, and fries, you need a very specific setup. A six-burner range sounds versatile, right? But in reality, a 36-inch flat-top griddle combined with a bank of two deep fryers is way more efficient for that menu. You're dedicating equipment to your top-selling items, which is exactly what you want to do.
Let your menu guide your choices:
- Burger & Steak Focused? A charbroiler and a flat-top griddle are non-negotiable.
- Fry-Heavy Menu? You'll need multiple deep fryers, with dedicated baskets for different items (like fries and fish) to stop flavor transfer.
- Diverse Sauté Menu? A multi-burner commercial range is your best friend, giving you the flexibility for all that pan work.
Strategic Refrigeration Beyond the Walk-In
Every kitchen needs a main walk-in cooler, that’s a given. But the real secret to a smooth kitchen workflow is what I call "decentralized refrigeration." By putting smaller coolers at key points of use, you eliminate wasted steps and keep your staff locked into their stations during a busy service.
This is where under counter refrigerators and under counter freezers become absolute game-changers. An under counter unit at the end of the cook line can hold pre-portioned steaks or sauces, saving the grill cook a trip back to the main cooler. In the same way, an under counter freezer right next to the deep fryer can hold baskets of fries, wings, and other frozen goods.
This strategy works for any kind of place:
- Seattle Bar Equipment: A back bar cooler keeps bottled beers and mixers perfectly chilled and right where the bartender needs them. Under-counter refrigeration for garnishes and juices makes drink prep way faster.
- Seattle Coffee Shop Refrigerators: Putting a small milk refrigerator right next to the espresso machine saves the barista crucial seconds on every latte. A glass-door merchandiser by the register is perfect for encouraging impulse buys of bottled drinks and grab-and-go snacks.
Every one of these decisions—from the size of your sandwich prep table to where you stick an under counter freezer—should be a direct answer to a need created by your menu. When you let your menu drive your equipment selection, you build a kitchen that isn't just functional, but one that's truly optimized for profit and efficiency. If you need more help figuring out exactly what to buy, our commercial kitchen equipment checklist is a great place to start organizing your list.
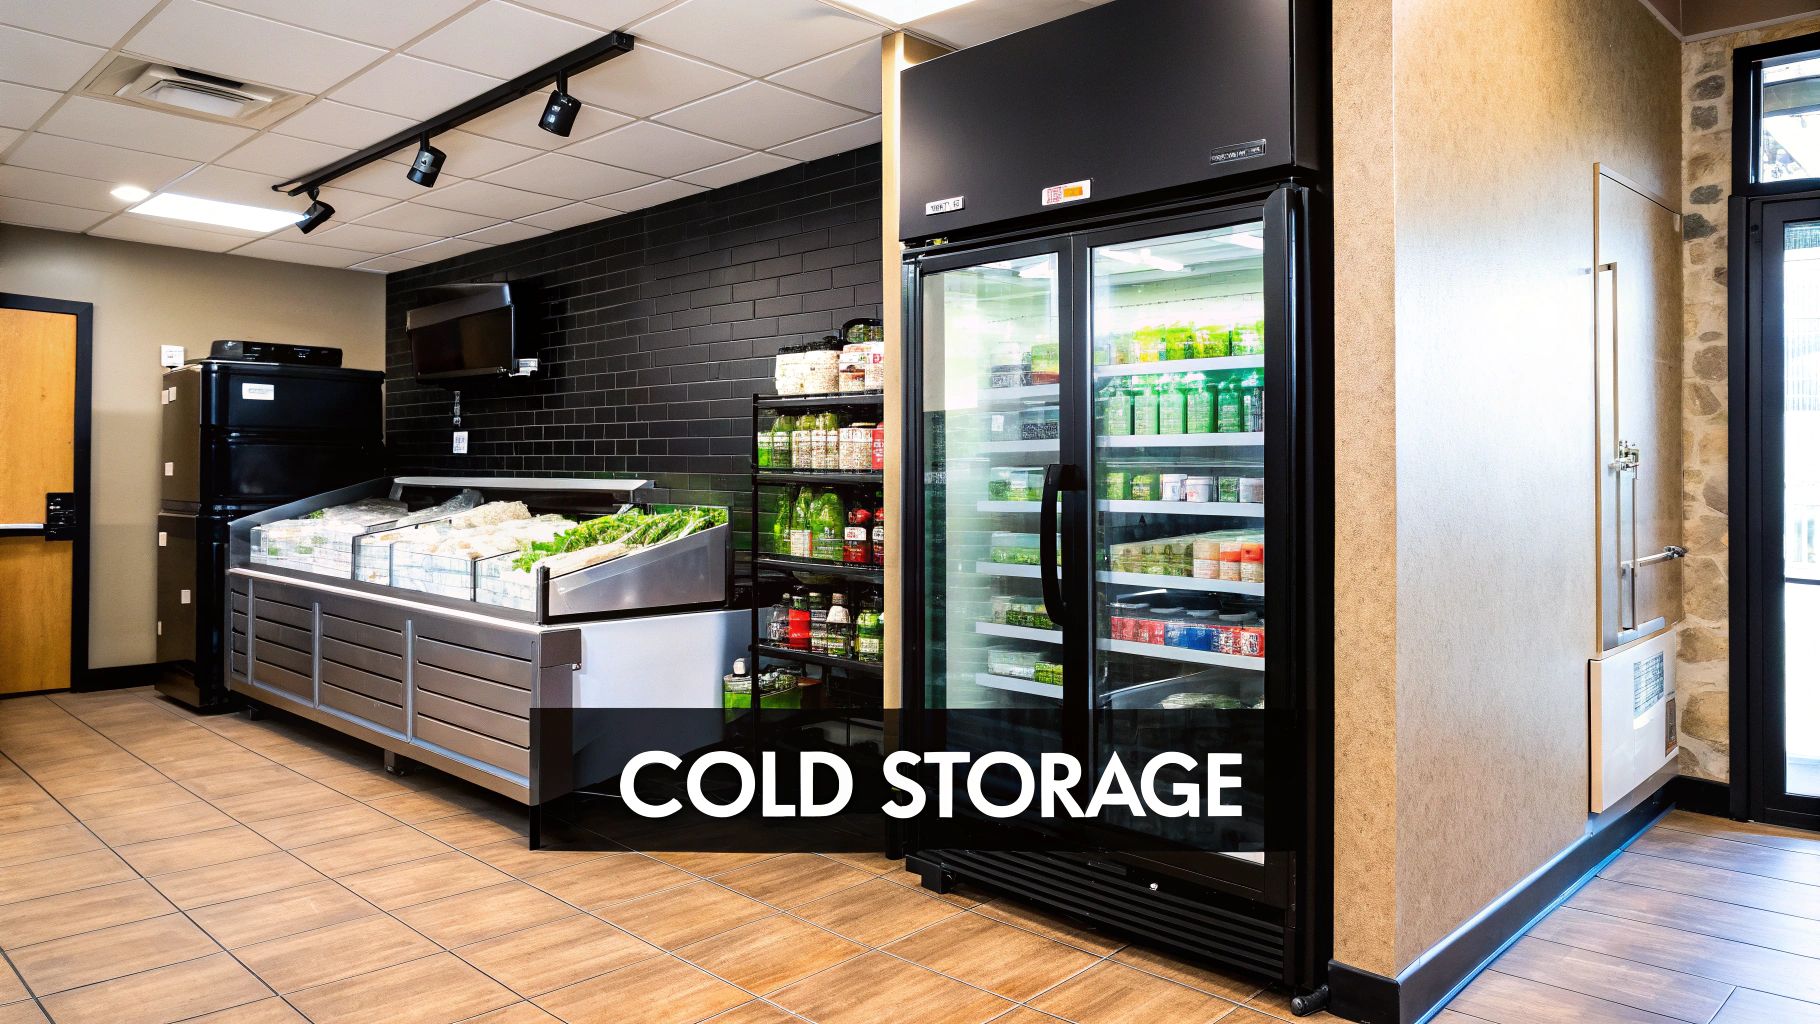
4. Plan Your Cold Storage Ecosystem
The cooking line gets all the attention, but your cold storage is the true unsung hero of your kitchen. Get this part right, and you’ve built the foundation for food safety, smart inventory control, and a smooth daily workflow. This isn’t just about buying a big fridge; it's about creating a network of cold zones that support every single station in your kitchen.
Think of it this way: you’re building a system to protect your most valuable assets—your ingredients. A solid strategy cuts down on waste, keeps your product quality high, and gives your team the tools they need to fly through service. This is one of those areas where investing in reliable, commercial-grade equipment like commercial refrigerators and commercial freezers pays for itself every single day.
Nail Down Your Cold Storage Needs
First things first, you need to understand the different roles your cold storage will play. While they all keep things cold, commercial refrigerators and commercial freezers have very different jobs and need to be planned out separately.
Your refrigerator is for the short-term, high-turnover stuff: fresh produce, dairy, proteins for the next day or two, and prepped sauces. Your freezer, on the other hand, is for the long haul—frozen proteins, bread, fries, and other bulk items. Keeping these functions separate is non-negotiable for food safety and basic organization.
I can't tell you how many new operators I've seen try to cram everything into one or two units. It's a classic mistake. The shelves get overpacked, air can't circulate, and temperatures fluctuate. That’s a fast track to spoilage and wasted money. A dedicated plan from the start avoids all that.
Choose Your Core Units: Walk-In vs. Reach-In
With the basics sorted, you can pick the main units that will anchor your cold storage system. It almost always comes down to a choice between walk-in and reach-in models.
- Walk-In Coolers & Freezers: These are the beasts of the kitchen, absolute workhorses for any high-volume operation. They give you massive storage capacity, perfect for bulk purchasing and holding big items like cases of produce or whole primals of meat. A walk-in isn't just a purchase; it's an investment in efficiency.
- Reach-In Refrigerators & Freezers: For smaller kitchens, cafes, or spots with lower volume, reach-ins are a more practical, space-saving choice. They keep inventory easily accessible and can be dotted around the kitchen to support specific zones.
Match Refrigeration to Your Concept
Beyond the big units, the real magic happens when you start tailoring your cold storage to your specific business. Different concepts have wildly different needs, and the right specialty equipment can be a game-changer for your workflow.
For a busy Seattle bar, speed and access are everything. The right setup means prioritizing Seattle bar equipment like:
- Back Bar Coolers: These glass-door units are essential. They keep bottled beers and wines perfectly chilled and double as a visual menu for your customers.
- Under Counter Refrigerators: You need these for juices, mixers, and garnishes, placed right where the bartender can grab them without ever leaving their station.
A cozy Seattle coffee shop has its own set of demands. A smart refrigeration strategy here would include Seattle coffee shop refrigerators such as:
- Milk Coolers: A dedicated unit right next to the espresso machine is a must. It saves the barista precious seconds on every single latte and cappuccino they make.
- Glass Door Merchandisers: Placed near the checkout, these are impulse-buy machines for bottled drinks, yogurts, and grab-and-go sandwiches.
Even smaller, specialized units can have a huge impact. An under counter freezer right next to the deep fryers can hold fries and appetizers, letting the fry cook stay locked in during a rush. This idea of "point-of-use" refrigeration is a cornerstone of smart, modern kitchen design.
Integrate Cold Storage Directly into Your Workflow
Finally, great cold storage is woven directly into your prep stations. This is where prep tables with built-in refrigeration become absolutely essential for any place doing sandwiches, salads, or pizzas.
A sandwich prep table, for instance, combines a refrigerated base for backup ingredients with a cooled rail on top for easy access to toppings, all under a cutting board. It’s a self-contained, high-efficiency workstation. A pizza prep table does the exact same thing, letting a cook build pies from start to finish without ever taking a step.
These pieces of equipment aren't just a convenience—they're fundamental tools for maximizing speed and consistency. As you weigh these important decisions, it's also a great time to learn more about selecting energy-efficient commercial refrigeration to keep your long-term operating costs in check.
Navigating Health Codes and Safety Rules
Let's talk about the part of your kitchen design that isn't sexy, but can shut you down before you even open: the rulebook. A brilliant layout means nothing if it can't pass a health inspection. Getting tangled in Washington state health codes, safety regulations, and permits can sideline your grand opening for weeks, even months.
This isn’t just about avoiding a slap on the wrist and a fine. It’s about building a fundamentally safe, clean, and efficient kitchen for your team from the ground up. This is where your design meets the non-negotiable reality of the law.
NSF Certification: The Baseline for Everything
When an inspector walks into your kitchen, their eyes are trained to look for one thing first: that small, circular blue NSF logo on your equipment.
NSF (National Sanitation Foundation) certification is the industry-wide stamp of approval. It’s a guarantee that a piece of equipment is built for food safety—meaning it uses non-porous materials, has smooth, easy-to-clean surfaces, and won’t harbor bacteria in tiny crevices.
This is why sourcing your gear from a trusted supplier like Seattle Restaurant Equipment makes life so much easier. Every item we carry, from a commercial refrigerator to a sandwich prep table, is commercial-grade and built to meet these tough standards. Choosing certified equipment isn’t just a good idea; it’s your fastest path to a green tag from the health department.
Spacing and Ventilation: Your Two Biggest Hurdles
Health codes go way beyond just the equipment itself—they dictate exactly where it can go. Proper spacing is a huge focus for inspectors. You absolutely have to leave enough room between your cooking line and the wall (usually at least 6-12 inches) and between each piece of equipment. If your staff can’t get behind it to clean, it’s an instant violation.
Ventilation is the other big one, especially for your hot line. Any piece of equipment that produces grease-laden vapor—think deep fryers, charbroilers, griddles, you name it—must live under a properly sized Type 1 ventilation hood. The hood’s size is directly determined by the gear underneath it. Skimping on this isn't just an inspection failure; it's a massive fire hazard.
I’ve seen operators get red-tagged because their fryer was just a few inches outside the hood’s capture area. It’s a costly and completely avoidable mistake. Plan your cooking line with ventilation as your absolute top priority.
Planning Your Plumbing and Electrical Hookups
Long before that shiny new convection oven shows up, you need a plan for how you’re going to power it. Every piece of equipment has specific utility needs that have to be mapped out in your initial design. A commercial ice machine needs a water line and a floor drain. A high-temp dishwasher needs a hot water hookup, a drain, and a specific electrical voltage.
Your equipment list directly dictates your building plan:
- Plumbing: Sinks, dishmachines, and ice makers all require dedicated lines and drainage. You'll also need floor drains strategically placed in prep areas and your dish pit.
- Electrical: Don't assume everything plugs into a standard wall outlet. High-powered equipment like ovens and some commercial freezers often demand 208/240-volt circuits that have to be installed by an electrician.
- Gas: Your cooking line will almost certainly need a professionally installed gas line with an emergency shut-off valve that's easily accessible.
Newer kitchen designs are also integrating more smart technology, with digital controls and remote monitoring becoming standard. For operators in Washington—whether you’re running a classic restaurant or a nimble food truck—this means choosing equipment that is both flexible and tech-ready. You can learn more about these commercial kitchen design service trends and see how the industry is evolving.
By mapping out all these requirements from day one and choosing compliant equipment, you ensure your kitchen isn't just efficient, but safe, legal, and ready to go.
Answering Your Top Kitchen Design Questions
As you dive into the nitty-gritty of designing a restaurant kitchen, some questions always seem to pop up. We hear them all the time from operators just like you. Let's tackle the most common ones with some straightforward, real-world answers.
How Much Does It Cost to Equip a Commercial Kitchen in Seattle?
This is the big one, and the honest answer is: it depends. The cost can swing wildly depending on what you're trying to do. A small coffee cart or food truck could get kitted out for $15,000 to $30,000. On the other hand, a full-service restaurant can easily blow past $250,000 without even trying.
The secret to keeping that number in check is to focus on the absolute essentials first. Your cooking line and your refrigeration are the heart of your operation—these are not the places to cut corners. At Seattle Restaurant Equipment, we help you stick to your budget by offering tough, commercial-grade equipment like commercial refrigerators, deep fryers, and sandwich prep tables without the inflated showroom prices. We also offer financing to make that initial investment a lot more manageable.
What Are the Biggest Kitchen Design Mistakes to Avoid?
We see the same costly mistakes over and over again. The top offenders are ignoring workflow, completely underestimating how much cold storage is needed, and trying to get by with cheap or undersized ventilation.
Too many new owners get excited and try to cram every possible piece of equipment into the space. This just creates a kitchen that's cramped, slow, and downright dangerous. Another huge misstep is not planning for your own success.
We always tell our clients to think six months, even a year, down the road. Spending a little more now on a slightly larger commercial refrigerator or a more powerful deep fryer can save you the massive headache and expense of a full-on upgrade when business really starts booming.
How Do I Design a Kitchen for a Small Space?
When you’re working with tight quarters, every single inch counts. Your new mantra should be "multi-functional and vertical."
- Look for equipment that can pull double duty. A chef base, for instance, gives you refrigerated drawers right under your griddle or range.
- Get everything you can up on the walls. Wall-mounted shelves are perfect for getting ingredients, pans, and smallwares off your precious counter space.
- Make under-counter units your best friends. Under counter refrigerators and under counter freezers are non-negotiable for maximizing your floor plan and setting up efficient little work stations.
A smart choice like a sandwich prep table from Seattle Restaurant Equipment can serve as a compact, all-in-one hub for prep, cold storage, and assembly, saving you a ton of valuable real estate.
What Is the First Piece of Equipment I Should Choose?
Always—and I mean always—start with the equipment that brings your core menu to life. The cooking line is the anchor of your entire kitchen. Everything else is planned around it.
Think about it: if you're opening a classic burger joint, your flat-top griddle and deep fryers are where you begin. If it's a pizzeria, that pizza oven and pizza prep table are the first things on your list. Once you've locked in your cooking gear, you can figure out exactly what you need for refrigeration and storage. Most importantly, that cooking line dictates your ventilation needs, which is a massive budget item and a structural element you have to get right from day one.
At Seattle Restaurant Equipment, we're not just another supplier; we want to be your partner in building a kitchen that works as hard as you do. From the workhorse commercial freezers and essential Seattle bar equipment to specialized gear like Seattle coffee shop refrigerators, we’ve got the reliable, no-nonsense equipment you need. We support the startups, the food trucks, and the humble kitchens that just need good gear at a fair price. Check out our full selection and let’s start building your dream kitchen today at https://seattlerestaurantequipment.com.