

In any kitchen worth its salt, from a bustling Seattle diner to a Tacoma food truck, that commercial griddle is your workhorse. It's the money-making machine. Learning how to clean a commercial griddle isn't just about keeping up appearances; it's a direct investment in your bottom line. A solid cleaning routine protects your most vital asset, keeps your food safe, and stops those costly breakdowns that can bring a service to a grinding halt.
Why Griddle Cleaning Is Your Most Profitable Task
In the controlled chaos of foodservice, it’s all too easy to see end-of-shift cleaning as just another thankless chore. But that mindset misses the bigger picture: a clean griddle is a reliable, revenue-generating powerhouse. Honestly, a few minutes of daily care can save you from expensive repairs on essential gear like your deep fryers or ranges, adding years to their lifespan.
This commitment to maintenance creates a ripple effect. It sets a standard for the entire kitchen, influencing how everything from your commercial refrigerators to your sandwich prep tables is treated. A kitchen that values maintenance just runs smoother, with fewer surprise breakdowns and panicked calls to the repair guy.
Protecting Your Biggest Investment
For most Seattle restaurants, the kitchen equipment is a massive capital investment. Simply ignoring a task as basic as cleaning puts all that money at risk. The difference is stark: industry benchmarks show a griddle cleaned daily can last up to 20 years with minimal fuss. A neglected one? You'll be lucky to get 5-10 years out of it.
Think about this: daily cleaning can slash repair calls by as much as 40%. It's no secret that a huge number of restaurants fail in their first three years, and equipment breakdowns due to poor maintenance are a major contributor.
A dirty griddle isn't just a quality issue; it's a direct threat to your bottom line. It wastes energy, cooks food inconsistently, and can lead to a catastrophic equipment failure right in the middle of a rush.
Ensuring Food Quality and Safety
Proper cleaning does more than just protect the machine—it protects the quality of every single dish that leaves your kitchen. A pristine surface gives you even, predictable cooking temperatures. You avoid those dreaded hotspots that scorch pancakes while leaving burgers raw in the middle.
It also kills flavor transfer. Nobody wants their lunch service grilled cheese to taste faintly of this morning's bacon grease.
Beyond taste, that caked-on grease buildup is a major health and safety hazard. It's an open invitation for pests and a serious fire risk waiting to happen. All the wastewater and gunk you scrape off needs to go somewhere, and that ties directly into the health of your plumbing. Getting a handle on your drainage is critical, which you can read more about in our guide to grease trap sizing. Ultimately, a clean griddle is a cornerstone of passing Washington health inspections and keeping your whole operation safe and compliant.
Assembling Your Griddle Cleaning Toolkit
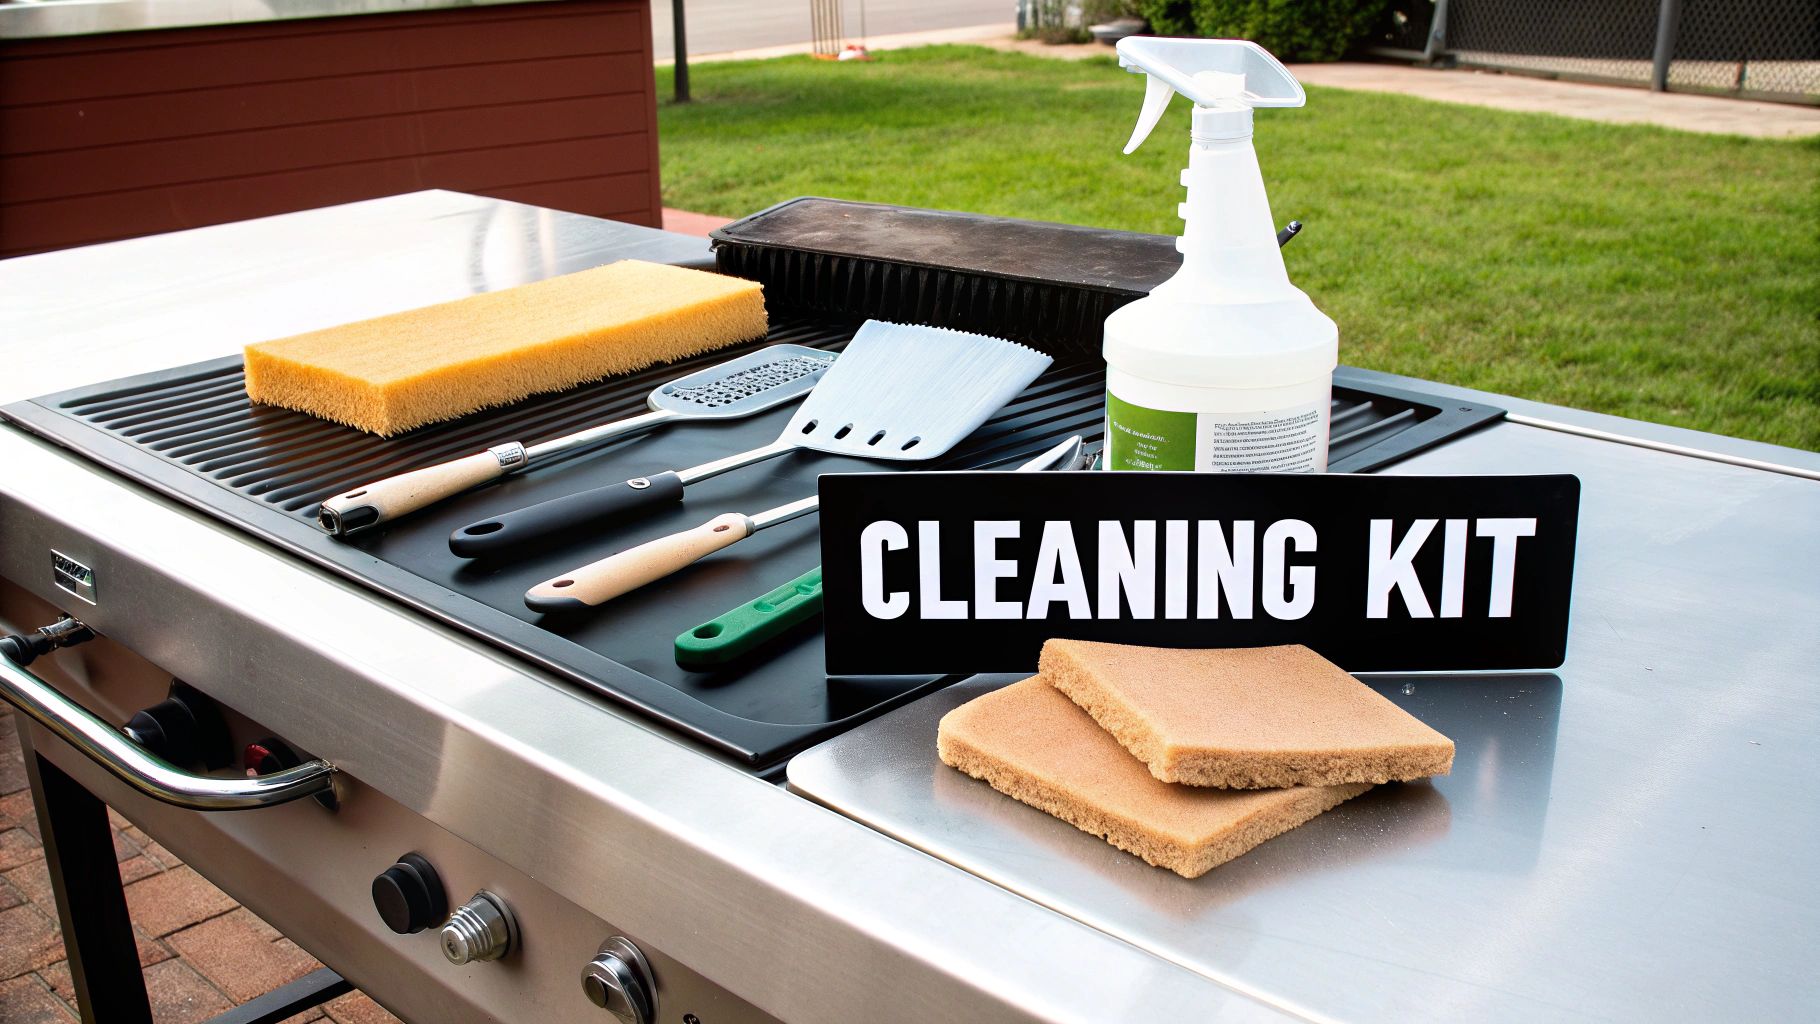
Let's talk tools. Using the wrong gear is a surefire way to ruin a perfectly good griddle surface, which leads to frustratingly uneven cooking and eventually, a costly replacement. Before you even think about cleaning, we need to build the right arsenal. This isn't about buying the priciest stuff on the shelf; it's about having an effective kit that your staff can use safely and correctly, every single time.
Think about it this way: you'd never take a wire brush to the coils of your commercial freezers. Your griddle deserves that same specialized care. If you take an aggressive, abrasive tool to a delicate chrome griddle, for instance, you’re just carving tiny scratches into the surface that will trap food particles and make everything stick.
Your Core Cleaning Supplies
Every kitchen in Seattle, whether you’re running a simple flat top or a complex charbroiler setup, needs a dedicated set of griddle tools. Having these on hand stops your crew from just grabbing whatever’s closest—a habit that can destroy expensive equipment in a hurry.
Here's a quick rundown of the must-haves:
- Heavy-Duty Griddle Scraper: Your first line of defense for getting the big chunks of food debris and built-up grease off after a rush.
- Grill Bricks or Pumice Stones: These are fantastic for standard steel surfaces. They power through that stubborn, baked-on carbon like nothing else.
- Non-Abrasive Scouring Pads: Absolutely non-negotiable for more delicate chrome or composite surfaces that scratch if you even look at them wrong.
- Food-Safe Degreaser: Invest in a quality, commercial-grade cleaner that’s actually formulated to break down grease without leaving behind nasty chemical residues.
- Squeegee: The most efficient way to clear away dirty water and cleaning solution straight into the grease trap. No messy puddles left behind.
- Heat-Resistant Gloves: This is a pure safety issue. Your staff needs protection when cleaning a griddle that’s still warm. Don't skip these.
Before we move on, let's break down these essentials into a quick reference table. Having the right tool for the job makes all the difference between a quick, effective clean and a frustrating battle with stuck-on grime.
Essential Tools for Griddle Maintenance
| Tool/Supply | Primary Use | Best For Surface Type | Pro Tip |
|---|---|---|---|
| Griddle Scraper | Removing heavy food debris and grease | All surfaces (use with care on chrome) | Choose one with a long, sturdy handle to keep hands away from the heat. Keep the blade sharp. |
| Grill Brick | Scrubbing off tough, carbonized buildup | Standard steel or cast-iron | Use with a bit of oil on a warm surface for the best results. Never use on chrome. |
| Scouring Pads | General cleaning and polishing | Non-abrasive pads for chrome; medium-duty for steel | Color-coded pads can help prevent cross-contamination and surface damage. |
| Degreaser | Breaking down stubborn, cooked-on grease | All surfaces (check manufacturer specs) | Look for a food-safe, non-toxic formula. Apply to a warm, not scorching hot, griddle. |
| Squeegee | Clearing liquids and cleaning solution | All flat-top surfaces | A wide blade makes the job faster. Clears the surface for the final seasoning step. |
| Gloves | Protecting hands from heat and chemicals | N/A - for staff safety | Go for high-cuff, heat-resistant gloves that also offer chemical protection. |
Having this specialized kit ready ensures your team can handle the daily upkeep that keeps your griddle performing at its best, day in and day out.
If your current unit is scratched beyond saving or you’re thinking about an upgrade, it's worth seeing what new surface technologies are out there by exploring different commercial griddles in Seattle. Getting your toolkit right is the foundational first step in a proper maintenance routine that will protect your investment.
The 5-Minute End-Of-Shift Wipe Down
In any commercial kitchen, consistency is king. That end-of-shift cleanup you dread doesn't have to be some drawn-out, hour-long chore. In fact, a quick but crucial five-minute routine is your griddle's best defense against the stubborn carbon that causes hotspots and ruins a good sear.
Mastering this daily habit means your griddle is always ready for the next service. This isn’t just about looking clean; it’s about performance. A griddle that gets a quick wipe while it’s still warm is a thousand times easier to maintain than one left to die overnight. You're preventing minor splatters from turning into a major deep-clean project, and that saves a ton of labor hours down the road.
Start While It's Still Warm
The golden window for cleaning is right after you've shut the griddle off—it's cooled down a bit but is still warm to the touch, somewhere around 300-350°F. This is the sweet spot. The grease is still loose and pliable, but it's not so hot that water will flash into a dangerous cloud of steam. Get this timing right, and the whole process is a breeze.
Your main tool here is a long-handled griddle scraper.
- Get the Angle Right: Hold the scraper at a sharp angle to the surface.
- Use Firm Pressure: Push all that loose food debris, gunk, and leftover oil straight into the grease trough with steady, even strokes.
- Be Methodical: I always tell my crews to start from the back and work their way forward, making sure to cover every inch.
This initial scrape-down is the most important part of the whole routine. It gets rid of 80% of the mess in under a minute. The goal isn't perfection; it's about doing the heavy lifting while the heat is still on your side.
The Water and Wipe-Down
Once you've scraped off the big stuff, it's time to clean. With the griddle still warm, carefully pour a little room-temperature water across the surface. You'll hear it sizzle and bubble up, which is exactly what you want—it's lifting that final fine layer of grease right off the steel.
A word of caution: Never, ever use ice or cold water on a hot griddle. You risk thermal shock, which can warp or even crack the griddle plate. That’s an expensive mistake to make.
Grab a griddle squeegee or a non-abrasive pad on a long handle and work the hot water and grime toward the grease trough. This step flushes the whole surface clean. And don't forget to empty that grease drawer as needed. A full grease trap is a massive fire hazard and an open invitation for pests.
The Final Polish and Oil
After you squeegee the dirty water away, the residual heat will dry the surface pretty quickly. Give it one last pass with a clean, dry cloth or some paper towels to soak up any leftover moisture. Water is the enemy of a steel griddle—leave it wet, and you'll come back to rust spots in the morning.
The final, and most critical, step is protecting the surface. Pour on a very thin layer of cooking oil and use a clean cloth to spread it evenly until you have a light sheen. This quick seasoning pass protects the metal from air and moisture overnight and keeps the surface non-stick. Now you're truly ready for a seamless start to the next day's service.
Executing a Flawless Weekly Deep Clean
Daily wipe-downs are great for keeping the griddle looking good, but the weekly deep clean is what truly protects your investment. This is where you get serious, tackling the stubborn, caked-on grease that can kill your griddle’s efficiency and even become a safety hazard.
Think of it as non-negotiable. This routine is your best defense against fire hazards and pests, two things that can shut a kitchen down in a heartbeat. It’s the same level of care you'd give any other workhorse in your kitchen, like your pizza prep tables or Seattle bar equipment. This isn't just about looking clean; it's about running a safe, profitable operation.
Power Down and Disassemble
First thing's first: make sure the griddle is completely cool. Shut off the gas valve or unplug it from the wall. You should never, ever try to deep clean a hot or live appliance. This is basic kitchen safety, just like you’d follow before cleaning your commercial deep fryers.
Once you’re sure it’s safe, start taking it apart. Gently remove any detachable components, which usually include:
- The grease trap or collection drawer
- Side splash guards
- Any other removable pieces specific to your model
These parts are magnets for the worst of the gunk. Getting them off the unit and setting them aside for a good, long soak is the only way to get the job done right.
Your weekly deep clean is more than a chore; it’s a critical safety inspection. It's your chance to check for frayed wires, clogged drains, and other small issues before they escalate into major, service-disrupting problems.
The Soak and Scrub
Get your three-compartment sink ready. Fill one basin with hot water, a bit of soap, and a powerful, food-safe degreaser. Submerge the grease trap and splash guards, letting them soak for at least 15-20 minutes. This will do most of the heavy lifting for you by dissolving all that hardened grime.
While those parts are soaking, turn your attention back to the main griddle. Apply your degreaser directly to the cooktop and use a non-abrasive pad or a putty knife to carefully work off any carbonized buildup. Don’t forget the sides, back, and front of the unit—grease splatter gets everywhere.
Skipping this weekly ritual will hit you right in the wallet. A dirty griddle can use up to 50% more energy as it struggles to heat through all that buildup, potentially adding $2,000 annually to your utility bills for a standard unit. On the flip side, a thorough clean can cut pest activity around your prep stations by a whopping 60%, a number that will make any health inspector happy.
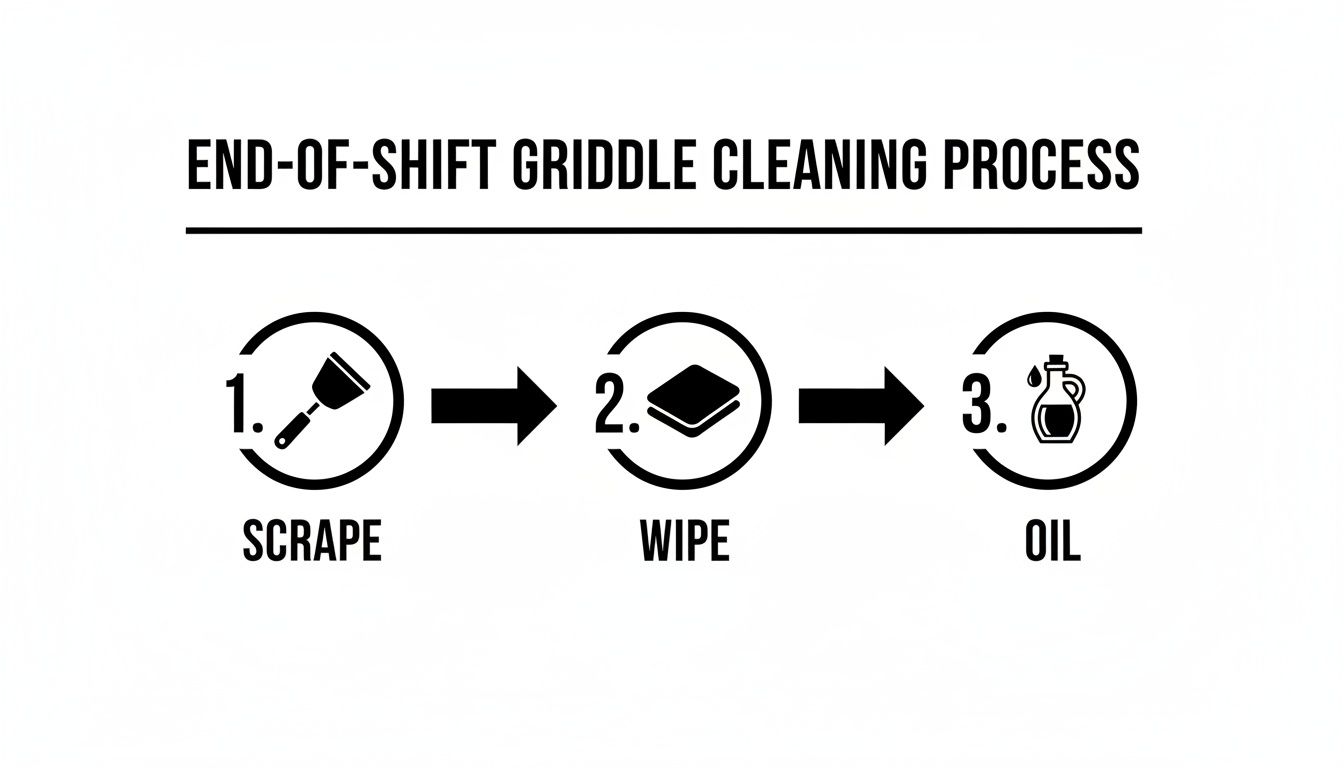
This process perfectly complements the quick end-of-shift routine. By breaking it down into these three simple actions—scrape, wipe, and oil—your staff can easily maintain the griddle's surface between those essential deep cleans.
Reassemble and Protect
Once the soaking parts are clean, give them a thorough rinse with fresh water and dry them completely. Trapped moisture is rust’s best friend, so don't cut corners here.
Back at the griddle, give the main surface a final rinse to wash away any leftover degreaser. Squeegee it dry, then apply a very light coat of oil to season the surface and protect it from moisture. This last step is what preps your griddle for another week of peak performance, getting it ready for whatever your menu throws at it.
How to Season Your Griddle for a Perfect Non-Stick Finish
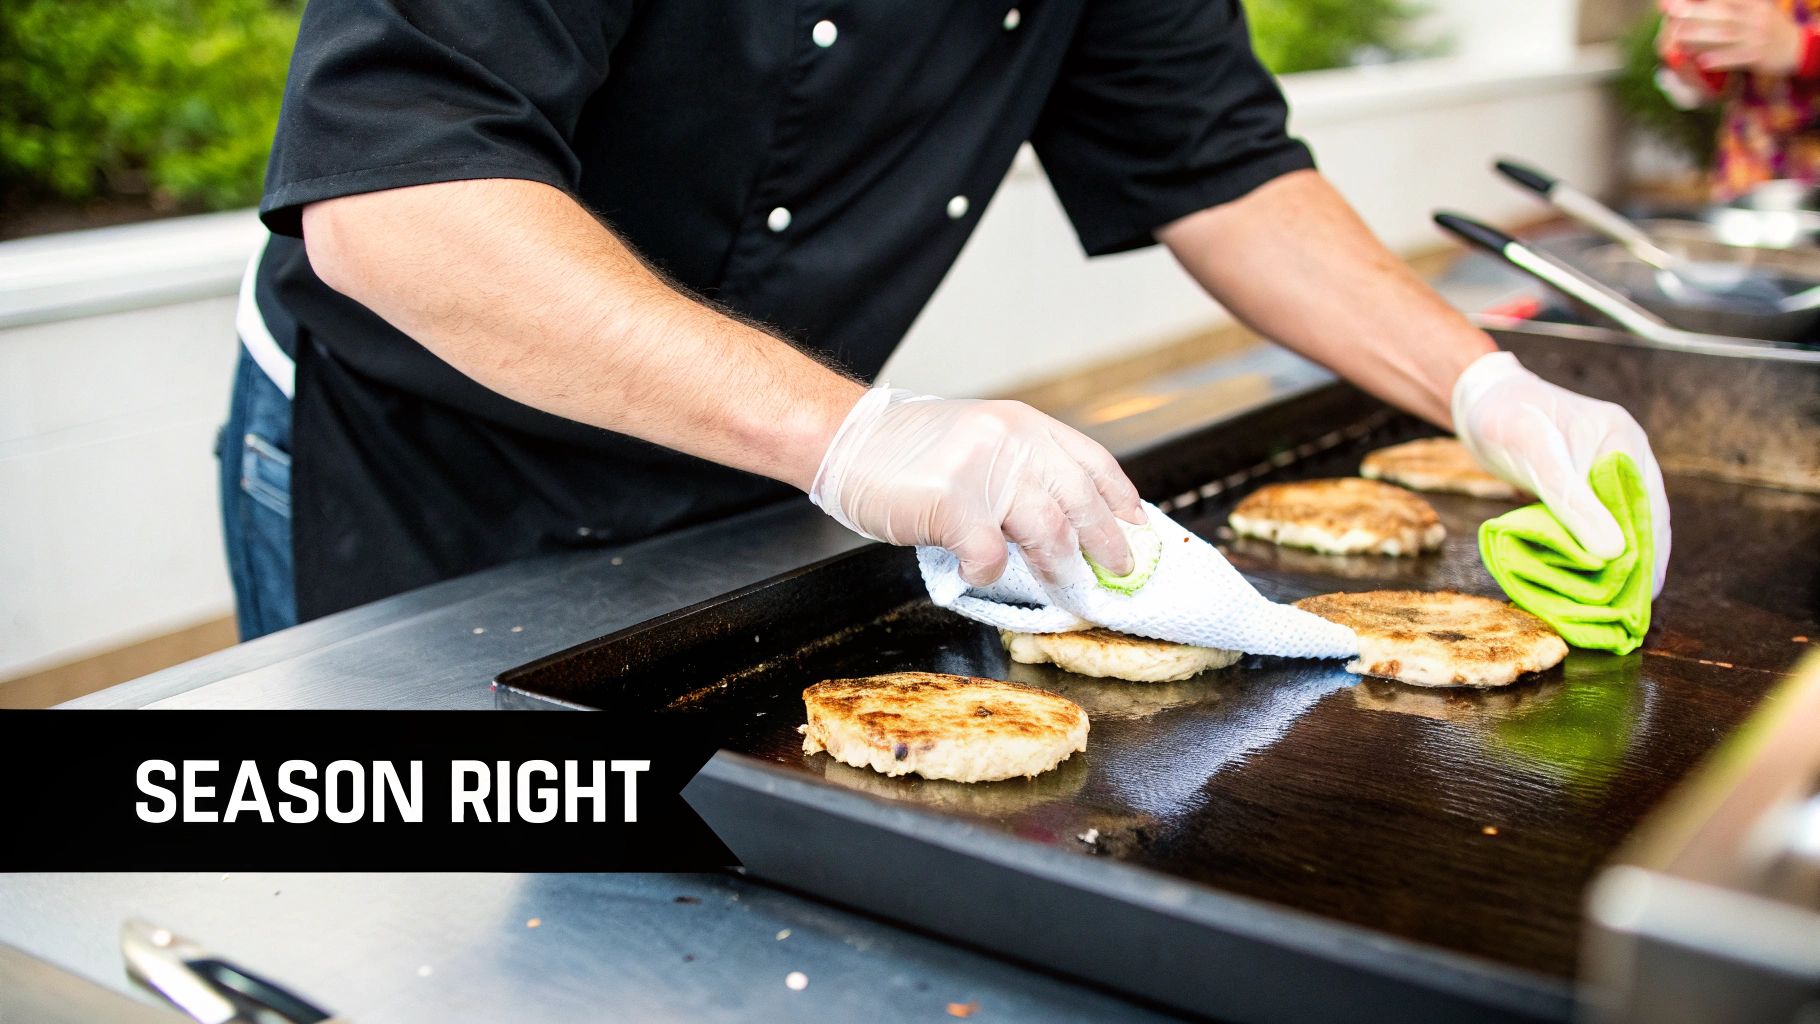
That perfect, glass-like sear doesn't come from some chemical non-stick coating. It comes from a properly seasoned griddle. The process is called polymerization, where thin layers of oil are baked onto the steel, creating a natural, slick surface that just gets better and better with every cook.
It’s the only way to get that beautiful dark patina that makes food slide right off and protects your griddle from rust.
Seasoning isn't a one-and-done deal, either. It’s absolutely essential for a brand new griddle, but you'll also need to re-season after a serious deep clean, especially if you had to take a grill brick to any rust spots. Just think of it as hitting the reset button and building a fresh foundation for your next shift.
Choosing the Right Seasoning Oil
The kind of oil you use makes a huge difference. You need something with a high smoke point, which means it can handle the heat without turning into a smoky, sticky disaster. Stay away from oils with low smoke points, like extra virgin olive oil—it will just burn.
Here are your best bets for building a rock-solid seasoning layer:
- Canola Oil: The workhorse. It's cheap, easy to find, and has a great smoke point.
- Grapeseed Oil: A fantastic choice with a neutral flavor and a very high smoke point.
- Vegetable Shortening: This is the old-school classic that creates an incredibly durable surface.
Whatever you do, don't use butter or bacon grease for your initial seasoning. While they're great for cooking, they have milk solids and other bits that will just burn, preventing you from getting that smooth, even finish you're after.
The goal here is to build up multiple, paper-thin layers of baked-on oil. Drowning the griddle in oil won't make it go faster; you’ll just end up with a weak, gummy coating that flakes off into your food. Patience is everything.
The Seasoning Process From Start to Finish
Alright, you've got your oil. Let's build that perfect cooking surface.
Start with a completely clean and dry griddle. Crank the heat up to medium-high—you’re aiming for somewhere around 350-400°F—and let it get good and hot for about 10-15 minutes.
Once it’s heated, pour a tiny amount of oil on the surface. A single tablespoon is plenty for a standard griddle. Grab a folded paper towel or a clean, lint-free cloth with a pair of tongs and spread that oil over the entire surface. You want a micro-thin, even layer. It should look like a slight sheen, not an oil slick.
Let the oil heat until it just starts to smoke, then kill the heat. As the griddle begins to cool, the oil literally bonds with the metal. Let it cool down a bit, then do it again. Repeat this whole process 3-5 times.
Each layer builds on the last, creating a progressively darker and more non-stick surface. Getting this foundational seasoning right makes every future cleaning quicker and your griddle work as reliably as your essential Seattle coffee shop refrigerators and under counter freezers.
Answering Your Top Griddle Cleaning Questions
Even with a solid routine, questions always come up. Here, we're tackling the most common issues we hear about from restaurant owners across Seattle. From rust spots that appear overnight to that black gunk that just won’t budge, we’ve got the answers.
How Often Should I Really Deep Clean My Griddle?
The honest answer? It comes down to volume. If you’re a high-traffic Seattle burger joint flipping patties from open to close, you need to do a full deep clean every single week. No exceptions.
But for a lower-volume spot, maybe a coffee shop that just uses the griddle for a few breakfast sandwiches, you can probably stretch that to every two to four weeks.
The biggest sign you've waited too long is when grease buildup in the trap or along the backsplash just isn't coming off with your daily wipe-down anymore. Don't let it get to that point. Sticking to a schedule is about more than just looks; a griddle fighting to push heat through old grime can spike its energy use by a staggering 50%.
Is It Ever Okay to Use Soap on the Griddle Surface?
This is a big one, and the answer is almost always no. You should avoid using soap directly on a steel or cast-iron cooking surface like the plague. Soap is made to strip grease, and that includes the beautiful, non-stick seasoning you've spent so much time building up. For your daily clean, warm water and a good scraper are all you need.
Now, soap and hot water are great for removable parts like the grease trap and splash guards. If you have a true disaster on the cooktop and have no other choice, just know you're signing up for more work. You'll have to rinse it like crazy, dry it completely, and then re-season the entire surface from scratch to stop it from rusting immediately.
Think of your griddle's seasoning like the coating on a non-stick pan at home. You wouldn't take steel wool to it, right? Don't use harsh soap on your seasoned griddle. The goal is to clean off the food, not the protective layer.
What’s the Best Way to Remove Stubborn Black Spots?
For those crusty, carbonized black spots that laugh at your scraper, a grill brick is your best tool for the job. After scraping off all the loose stuff, pour a little cooking oil on the warm griddle and gently rub the brick over the spot. The porous stone will break down the carbon without gouging the steel.
A huge word of caution, though: this trick is only for standard steel griddles. Never, ever use a grill brick on a chrome surface. It will leave permanent, deep scratches. For chrome, you have to use a non-scratch pad and a cleaner specifically made for chrome. It takes more patience, but it’s far better than ruining the surface for good.
My Griddle Is Starting to Rust. What Did I Do Wrong?
Don't panic—it happens. Rust is almost always caused by one of two things: moisture was left on the surface, or the seasoning was stripped off, exposing the raw metal to the air.
To fix it, you’ll need to scrub all the rust away with steel wool until you’re back to the bare metal. Clean the surface well to get rid of any tiny metal particles, and then immediately start the re-seasoning process. That means applying thin coats of oil and heating the griddle to build back that protective, non-stick layer.
The best defense is a good offense. After every single cleaning, wipe a very thin layer of oil over the entire cooktop. This simple step creates a barrier against moisture and is the single best way to keep your griddle rust-free and ready to go, just like the tough stainless steel finish on your commercial freezers or sandwich prep tables.
At Seattle Restaurant Equipment, we know that your equipment is the heart of your operation. Whether you're upgrading your griddle, adding under counter refrigerators for your coffee shop, or outfitting a new food truck with deep fryers, we provide the dependable, commercial-grade gear you need to succeed. Explore our full range of kitchen solutions today.